Gophish is an open-source phishing framework that enables penetration testers to conduct simulated phishing attacks to assess the security awareness of an organization’s employees. Its user-friendly dashboard makes it easy to set up a phishing campaign and gather results that can be presented to a client.
Although GoPhish is great at creating phishing simulations, it can encounter issues when running multiple campaigns for different domains simultaneously. Standard GoPhish does not handle issuing multiple certificates for different domains running concurrently very well. Attempting to use the same certificate for multiple domains will result in the dreaded SSL error, which can ruin your campaign before it even starts..
To solve this issue, you can use GoPhish with an Nginx reverse proxy. This will route traffic to the GoPhish server for each implemented domain, enabling us to handle multiple valid certificates for each of our domains simultaneously. We will begin by creating a Debian Micro instance for GoPhish in AWS.

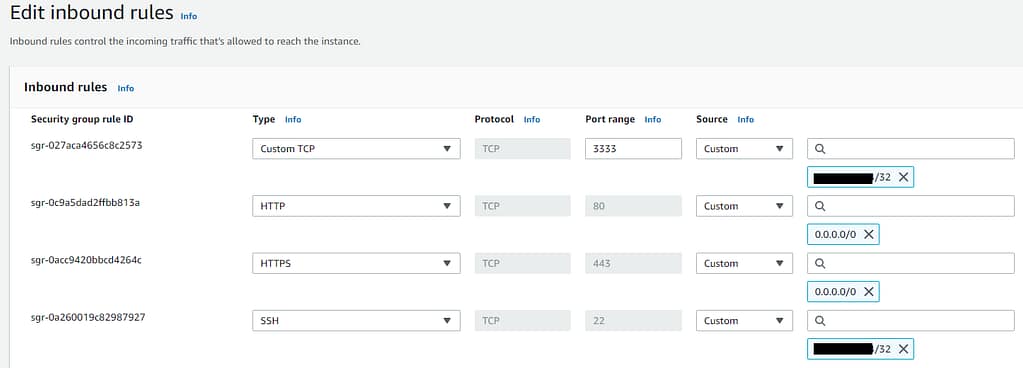
Next, create a key pair that will be used to SSH into the Debian instance. After that, create a security group and configure SSH to only allow traffic from your address, while allowing all HTTPS and HTTP traffic from the internet.

Once that is complete, the AWS instance can be launched. Copy the .pem file to your local virtual machine and use it to SSH into the AWS instance as an admin. Then, switch to the root account.
ssh -i "yourkey.pem" admin@yourawsip
sudo su
To set up the GoPhish reverse proxy, we will use two Docker containers: one for the GoPhish server and one for the Nginx reverse proxy. First, we will set up a Docker container for the GoPhish server. Run the following commands to install Docker.
apt-get update
apt-get install ca-certificates curl gnupg lsb-release
curl -fsSL https://download.docker.com/linux/debian/gpg | sudo gpg --dearmor -o /usr/share/keyrings/docker-archive-keyring.gpg

echo \
  "deb [arch=$(dpkg --print-architecture) signed-by=/usr/share/keyrings/docker-archive-keyring.gpg] https://download.docker.com/linux/debian \
  $(lsb_release -cs) stable" | sudo tee /etc/apt/sources.list.d/docker.list > /dev/null

apt-get update
apt-get install docker-ce docker-ce-cli containerd.io docker-compose-plugin
After installing Docker, we will use the Sneaky GoPhish Docker, which is essentially a standard GoPhish with a few evasion techniques to help evade defenses.
git clone https://github.com/puzzlepeaches/sneaky_gophish && \
  cd sneaky_gophish && \
  docker build -t sneaky_gophish .
After installing Sneaky GoPhish, you need to start the instance. Launch the instance for port 3333, which is the management port used to access the GoPhish dashboard and create campaigns.
docker run -itd --name sneaky_gophish -p 3333:3333 sneaky_gophishNow, we will add the Nginx Reverse Proxy Docker. To create the Docker, use the following command:.
docker run --name reverse_proxy -dit -p 80:80 -p 443:443 nginxThis command will launch an nginx web server inside a Docker container, running on ports 80/443. To enter the Docker container and execute commands, run the following command:
docker exec -it reverse_proxy bashAfter entering the Docker shell, execute the following commands to set up Certbot and nano.
apt update
apt install nano
apt install python3-acme python3-zope.interface python3-certbot python3-mock python3-openssl python3-pkg-resources python3-pyparsing
apt install python3-certbot-nginx
To configure Nginx, navigate to the directory /etc/nginx/conf.d and create a .conf file with the name of the domain you want to use. Then, add the following code to the file, making sure to modify it with your own domain name. The proxy_pass IP should be the internal IP address of your SneakyGoPhish docker, as this is how the traffic will be routed. You can create a separate .conf file for each domain you add, which will allow you to issue certificates for multiple domains at once.
server{
    listen 80;
    server_name yourwebsitename.com www.yourwebsitename.com;
    location / {
        proxy_pass http://172.17.0.1:80;
    }
}
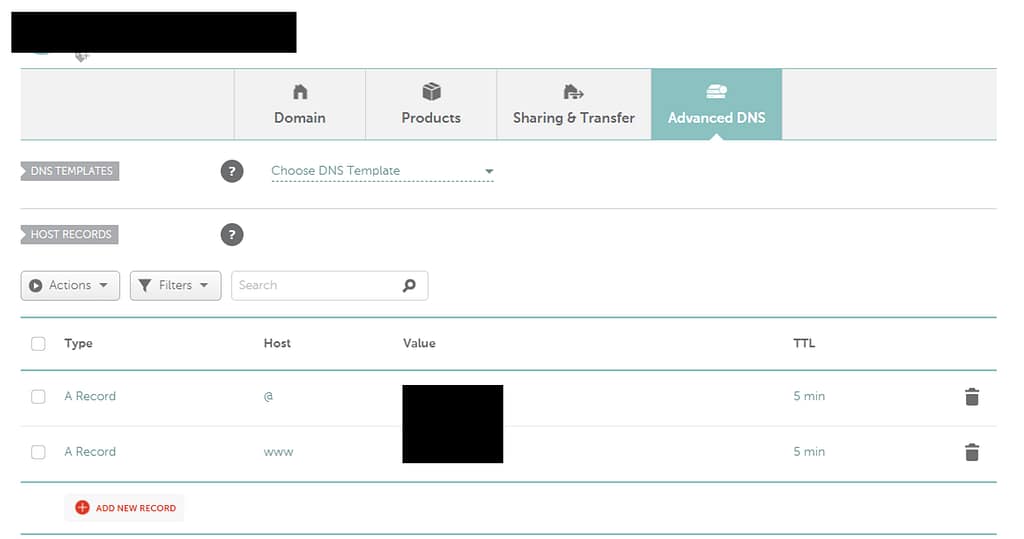
For creating domains, we use namecheap. Under Advanced DNS, create two A record’s, one for www and one for @, then hit save.

After completion, it may take a few minutes to route the IP address to the domain. You can now use Certbot to issue an SSL certificate for your domain.
certbot --nginxTo generate a certificate for your domain, enter the corresponding number when prompted (e.g. 1, 2, etc.).

To access the GoPhish dashboard, you need to allow access to port 3333 from your IP address in AWS..

To obtain the default username and password for your GoPhish dashboard, exit the reverse proxy Docker in the command line and execute the following command.
docker logs sneaky_gophish | grep passwordAfter completing the previous step, go to your GoPhish dashboard on the web and log in.

There you have it! You now have a GoPhish instance that can run multiple campaigns simultaneously.


